Replacing a Bad Tube
At the last SACA meeting I heard that Dave Nergaard had a bad leak in the boiler tube area, and would have to repair the bad tubes, so I asked if I could come over and help [which meant he would show me how to do it!]
As I have a fire tube boiler, I figured that I would probably have to replace some tubes sooner or later.
It turned out that Dave had only one bad tube leaking.
I arrived at Dave's house about 10:00 AM, and after jawing awhile Dave says let's get to it.
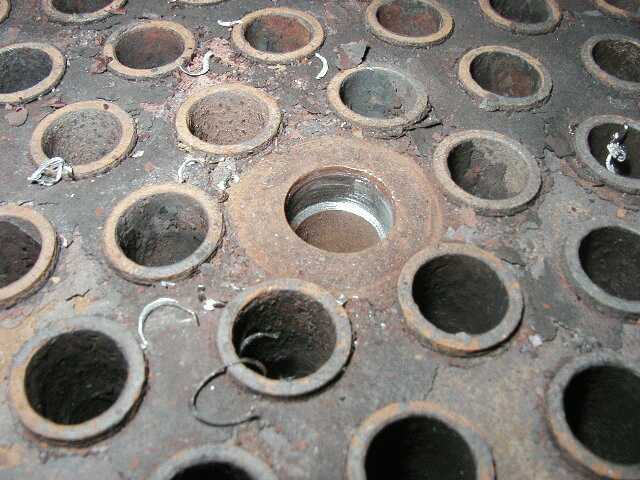
He had the smoke box and burner off already. After collecting the necessary tools, he proceeded to drill a pilot hole in the bad tube to 1/64 of an inch smaller than the existing tube diameter, to weaken the pressure against the crown sheet, caused by the rolling of the tube. He drilled down about 3/8 to 7/16 deep, enough to clear the thickness of the crown sheet.
Then, he went under the car to duplicate the process on the bottom of the tube. Luckily the super heater coil moved over slightly to allow the tube to be drilled.
Back to the top of the sheet and tube. He found a piece of material to fit the inside diameter of the tube, and inserted it down though the length of the tube. This would keep the tube from collapsing inward. At the end of this rod was a shoulder of larger knockout section , close to the OD size of the tube. This will knock out the tube,[with a little persuasion.] Once the tube is loose, tap it right thru and out the bottom.
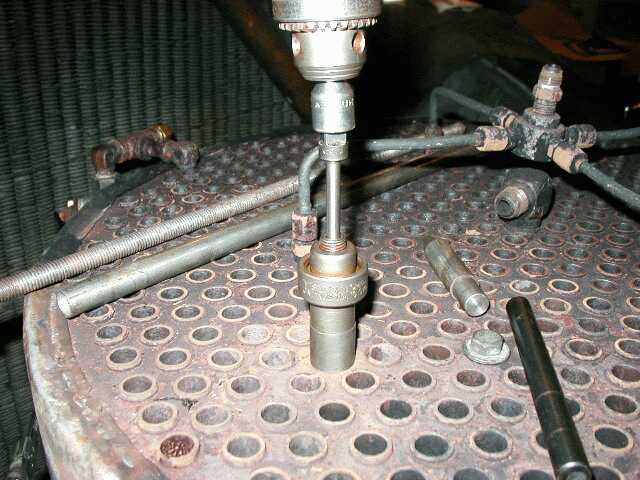
Next he inserted the new tube, leaving about 1/16 sticking up past the sheet on upper and lower sheets. Next he inserted the rolling tool into the bottom hole first, and roll swaged it while I held the tube at the top to keep it from spinning. Next he moved to the top of the boiler to repeat the swage-roll to the top of the tube.
He then filled the boiler with water, and hand pumped to about 400 psi., and switched over to a high pressure pump [which pump's up a lot easier] that fed into the feed water connection, and raised the pressure to about 1100 psi., NO LEAKS
This replacement took 1 1/2 hrs for the tube1/2 hr for lunch 1 1/2 hrs to reinstall the Smoke box and Burner hood and reconnect the plumbing, 3 1/2 hrs from start to finish I thought was a phenomenal job.
I guess EXPERIENCE is a plus.
This system worked well, as Dave's boiler was roll-swaged at both ends, some are welded at the bottom crown sheet. Maybe someone would do an article on how to repair a welded boiler tube.
Thanks, Dave for the lesson. Richard Olivier
Dave's comments: A Wilson roller tube expander was used, driven by a 1/2 inch electric drill with a home made torque sensing circuit to shut off the drill when the tube has been sufficiently rolled. Lying on top of the boiler, is the stepped pin with a smoooth tapered end which guides the tube through the upper tube sheet hole when it is pushed up from below. The drift pin used to drive out the old tube uses a tapped collar of the right diameter on a length of 1/2 inch threaded rod.
Return to Steam Help
Posted 20 June, 2003